Keras入门(四)利用CNN模型轻松破解网站验证码

项目简介

在之前的文章keras入门(三)搭建CNN模型破解网站验证码中,笔者介绍介绍了如何用Keras来搭建CNN模型来破解网站的验证码,其中验证码含有字母和数字。

让我们一起回顾一下keras入门(三)搭建CNN模型破解网站验证码的处理思路:

  • 利用OpenCV对图像进行单个字符的切割,大概400多张图片;

  • 对切割好的单个字符进行人工手动标记;

  • 搭建合适的CNN模型,对标记好的数据集进行训练;

  • 对于新的验证码,先切割单个字符,再对单个字符进行预测,组成总的预测结果。

    这一次,笔者将会换种思路,使用CNN模型来破解网站的验证码。我们的数据集如下:
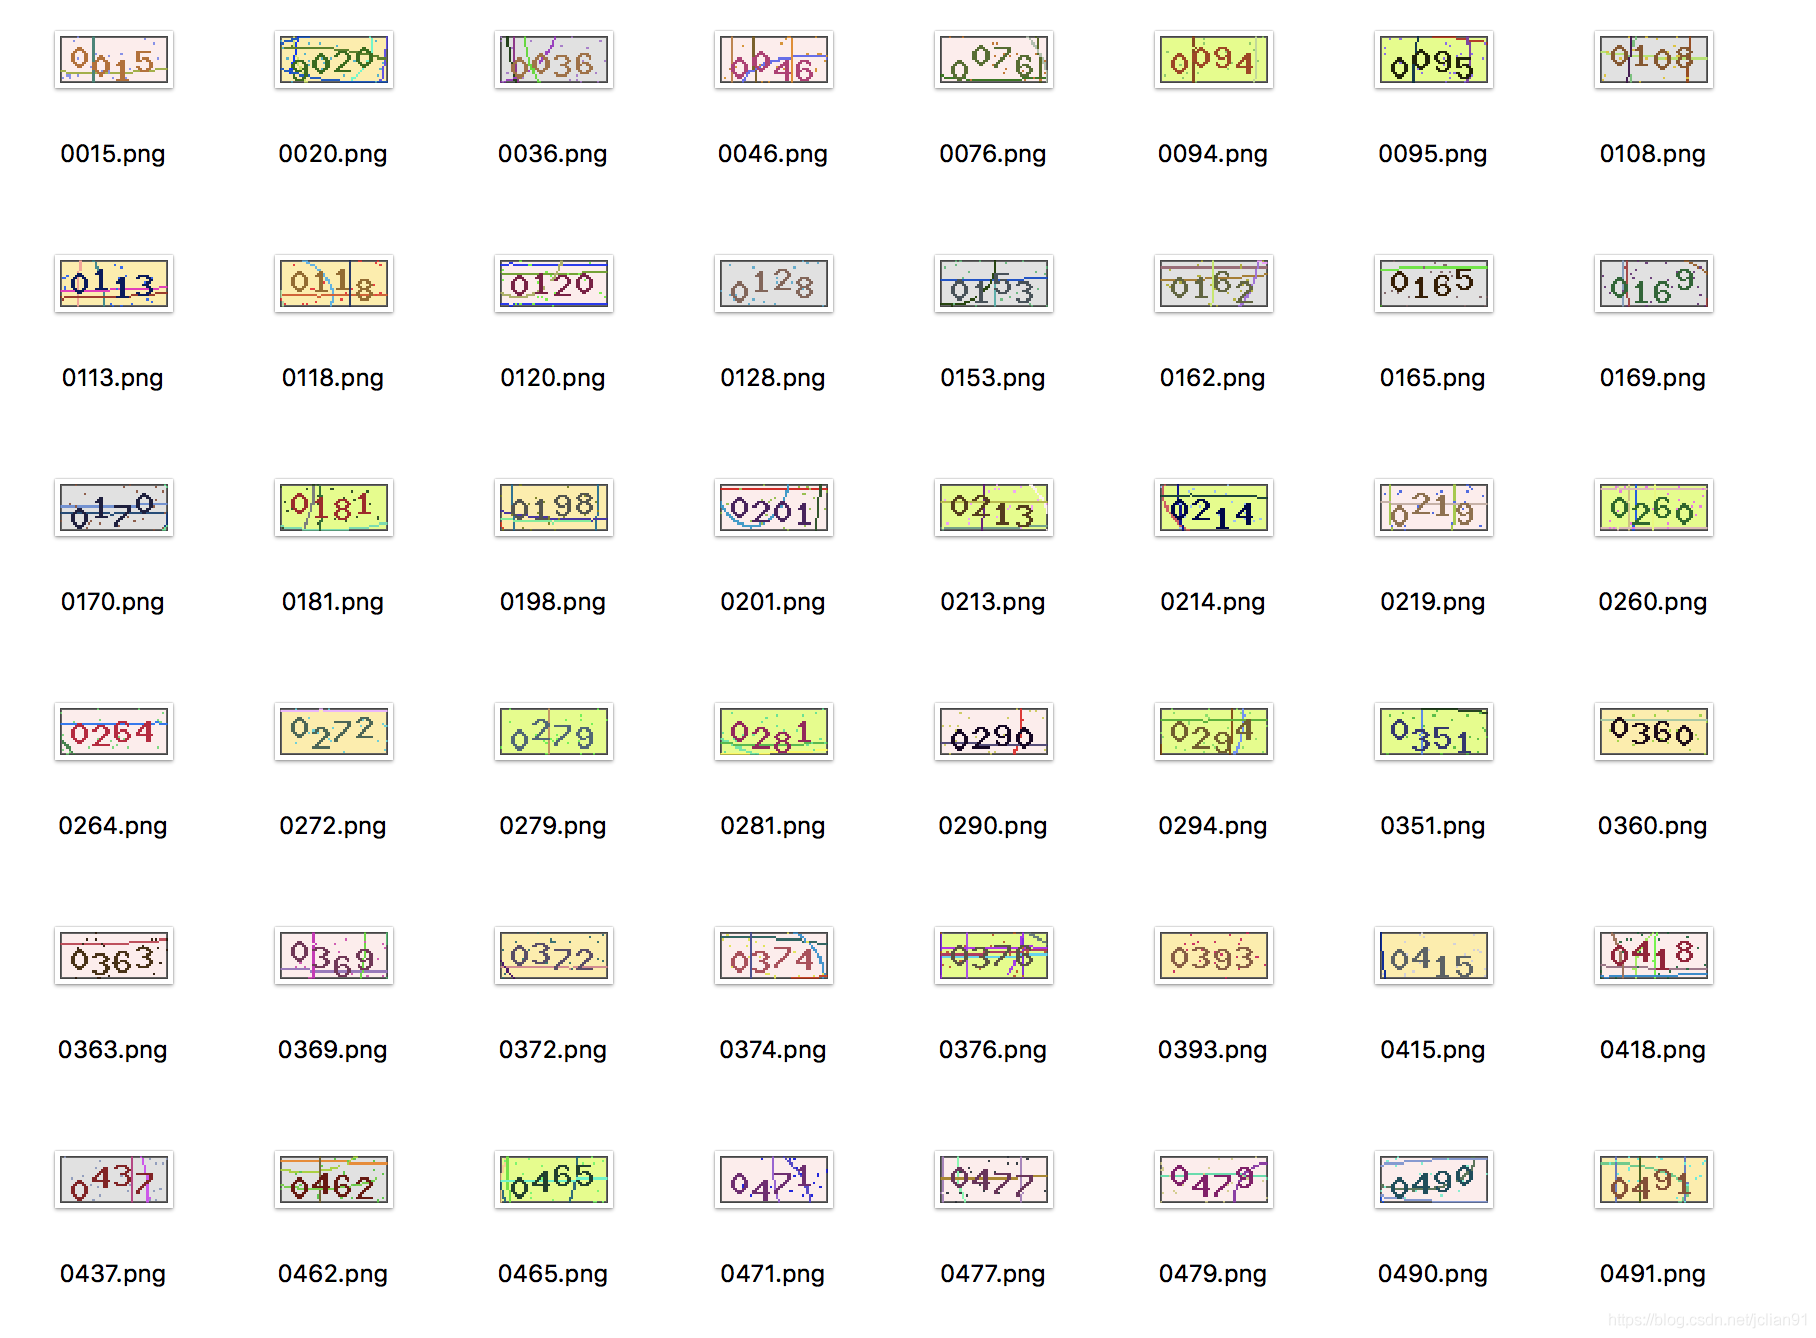
一共是946张图片,这里只展示了一部分,可以看到,这些验证码全部由数字组成。那么,新的破解验证码的思路是什么呢?如下:

  • 直接对验证码进行标记,标记的结果见上图;
  • 搭建合适的CNN模型对标记好的数据集进行训练;
  • 对新验证码进行预测。

这种思路的好处是,不需要对验证码进行繁琐的预处理,只需要简单的数据标记即可。

下面,笔者将会具体展示这个过程。

数据标记

数据标记绝对是个累活,当我想到要对946张图片进行标记并重命名,而且还要保证标记的准确性的时候,我开始是有点拒绝的心态,毕竟这项工作费时费力,而且能不能保证识别的效果还是个未知数。

就这么纠结了一段时间,原本年前就想做的项目一直拖到了现在,后来我想,能不能写个脚本,能够帮助我快速地进行数据标注,并自动保存呢?这么想着,我就动手自己做了一个由Tornado实现的前端页面,可以帮助我快速地标记数据并保存图片,页面如下:
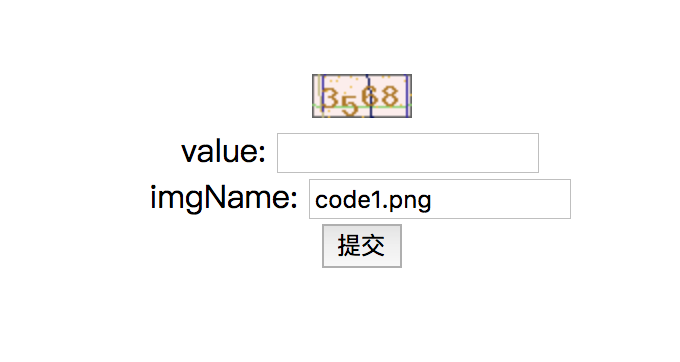
数据标记界面.png

界面虽然简陋,却能帮助我很好地提升数据标记的速度,只需要在value文本框中输入自己识别的结果,程序就能自动保存标记好的图片,并切换至下一张未标记的验证码。有了如此好的工具,结果我用了不到一小时就标记完了这946张验证码(其实是1000张,因为标记好的结果会有重复)。有机会笔者会介绍这个验证码标记的项目~

模型训练

标记完验证码后,我们就利用这946张验证码作为训练数据,训练CNN模型。我们使用Keras框架,CNN模型的结构图如下:
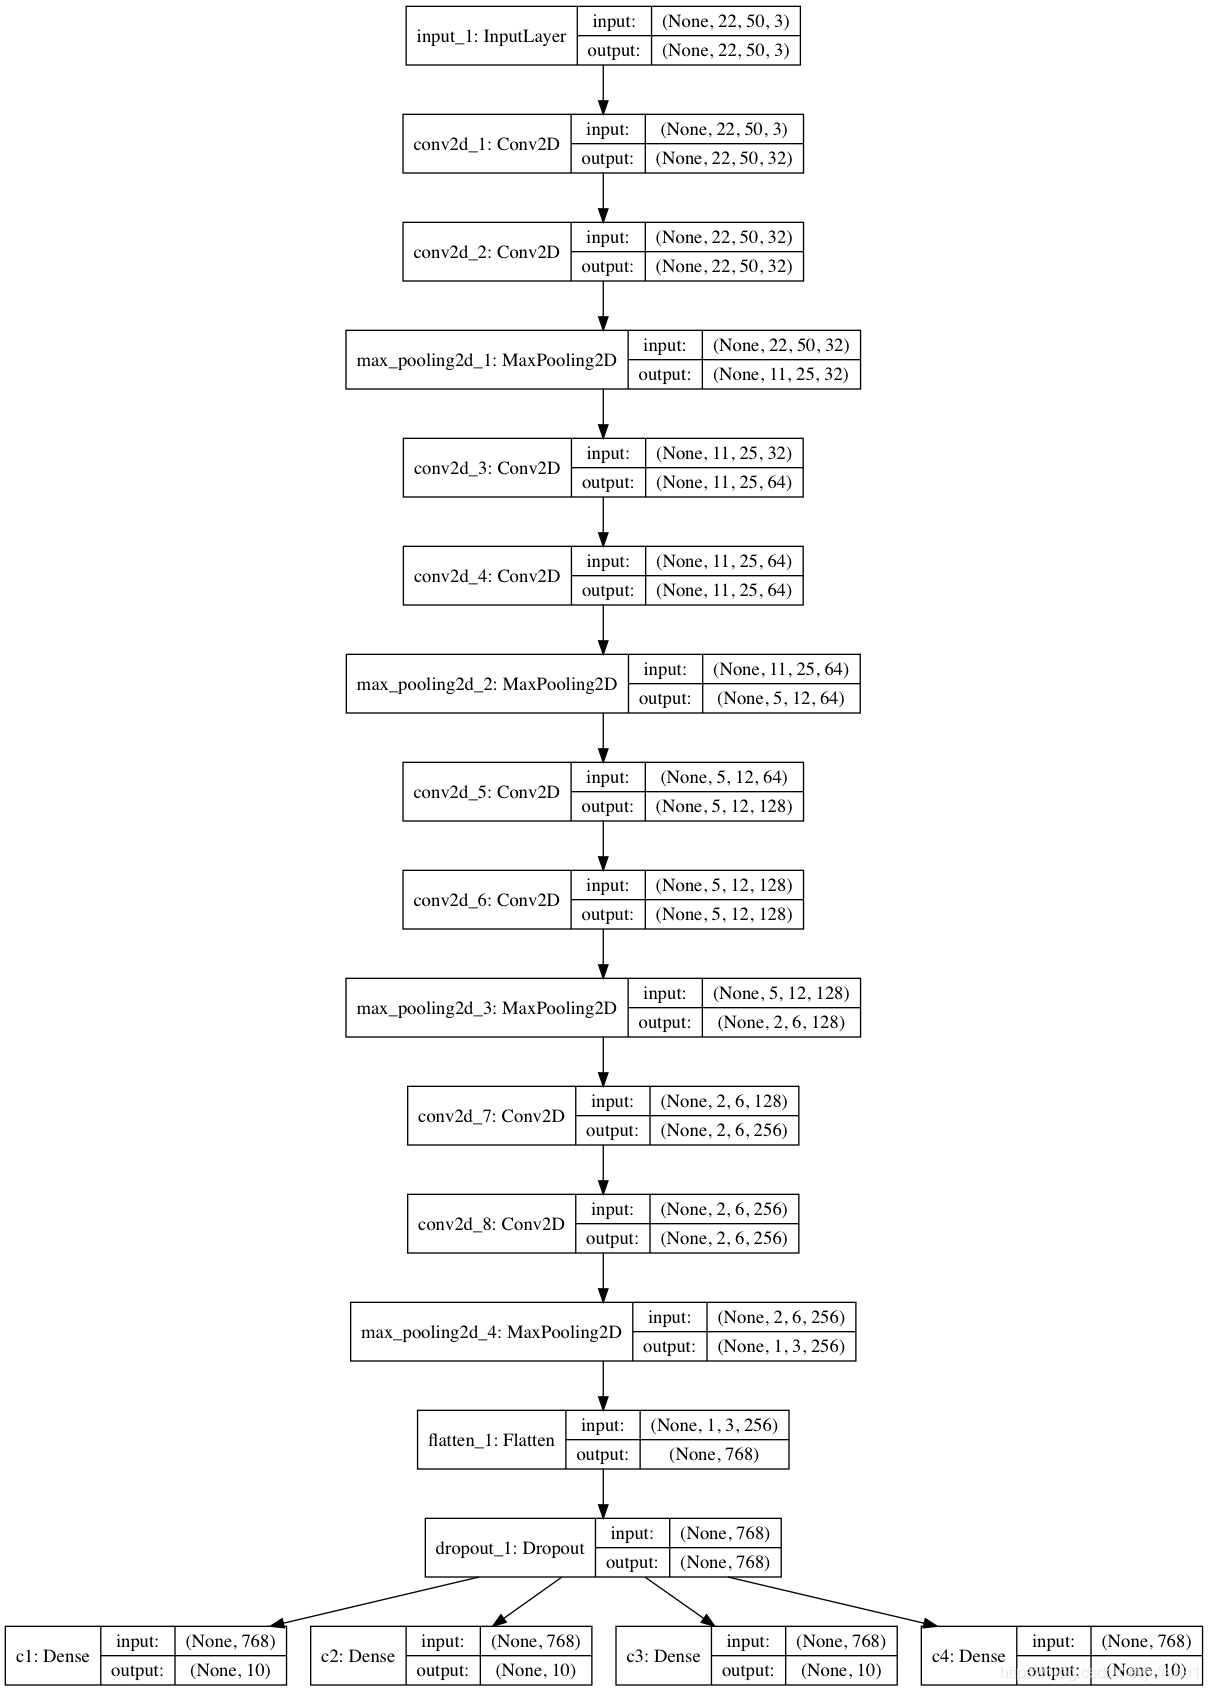
模型训练的Python代码如下:

1
2
3
4
5
6
7
8
9
10
11
12
13
14
15
16
17
18
19
20
21
22
23
24
25
26
27
28
29
30
31
32
33
34
35
36
37
38
39
40
41
42
43
44
45
46
47
48
49
50
51
52
53
54
55
56
57
58
59
60
61
62
63
64
65
66
67
68
69
70
71
72
73
74
75
76
77
78
79
80
81
82
83
84
85
86
87
88
89
90
91
92
93
94
95
96
97
98
99
100
101
102
103
104
105
106
# CNN模型训练

# -*- coding: utf-8 -*-
import cv2
import os
import random
import numpy as np
from keras.models import *
from keras.layers import *
from keras import callbacks

characters = '0123456789'
width, height, n_len, n_class = 50, 22, 4, 10

# 产生训练的一批图片,默认是32张图片
def gen(dir, batch_size=32):
X = np.zeros((batch_size, height, width, 3), dtype=np.uint8)
y = [np.zeros((batch_size, n_class), dtype=np.uint8) for _ in range(n_len)]
files = os.listdir(dir)
while True:
for i in range(batch_size):
path = random.choice(files)
imagePixel = cv2.imread(dir+'/'+path, 1)
filename = path[:4]
X[i] = imagePixel
for j, ch in enumerate(filename):
y[j][i, :] = 0
y[j][i, characters.find(ch)] = 1

yield X, y


input_tensor = Input((height, width, 3))
x = input_tensor

# 产生有四个block的卷积神经网络
for i in range(4):
# 卷积层
x = Conv2D(32 * 2 ** i, (3, 3), activation='relu', padding='same')(x)
# 池化层
x = MaxPooling2D((2, 2))(x)

x = Flatten()(x)
x = Dropout(0.25)(x)

# 多输出模型,使用了4个'softmax'來分别预测4個字母的输出
x = [Dense(n_class, activation='softmax', name='c%d' % (i + 1))(x) for i in range(4)]
model = Model(inputs=input_tensor, outputs=x)
model.summary()

# 保存模型结构图
from keras.utils.vis_utils import plot_model
plot_model(model, to_file="./model.png", show_shapes=True)

model.compile(loss='categorical_crossentropy',
optimizer='adadelta',
metrics=['accuracy'])

# 保存效果最好的模型
cbks = [callbacks.ModelCheckpoint("best_model.h5", save_best_only=True)]

dir = './result'
history = model.fit_generator(gen(dir, batch_size=8), # 每次生成器会产生8张小批量的图片
steps_per_epoch=120, # 每次的epoch要训练120批图片
epochs=50, # 总共训练50次
callbacks=cbks, # 保存最好的模型
validation_data=gen(dir), # 验证数据也是用生成器來产生
validation_steps=10 # 用10组图片来进行验证
)

# 绘制损失值图像
import matplotlib.pyplot as plt

def plot_train_history(history, train_metrics, val_metrics):
plt.plot(history.history.get(train_metrics), '-o')
plt.plot(history.history.get(val_metrics), '-o')
plt.ylabel(train_metrics)
plt.xlabel('Epochs')
plt.legend(['train', 'validation'])


# 打印整体的loss与val_loss,并保存图片
plot_train_history(history, 'loss', 'val_loss')
plt.savefig('./all_loss.png')

plt.figure(figsize=(12, 4))

# 第一个数字的正确率
plt.subplot(2, 2, 1)
plot_train_history(history, 'c1_acc', 'val_c1_acc')

# 第二个数字的正确率
plt.subplot(2, 2, 2)
plot_train_history(history, 'c2_acc', 'val_c2_acc')

# 第三個数字的正確率
plt.subplot(2, 2, 3)
plot_train_history(history, 'c3_acc', 'val_c3_acc')

# 第四個数字的正确率
plt.subplot(2, 2, 4)
plot_train_history(history, 'c4_acc', 'val_c4_acc')

# 保存图片
plt.savefig('./train.png')

在这个代码中,我们总共训练了50个epoch,每个epoch共120次批次,每个批次是8张验证码,每张验证码的大小为50*22。

运行该训练模型,后几个epoch的输出结果如下:
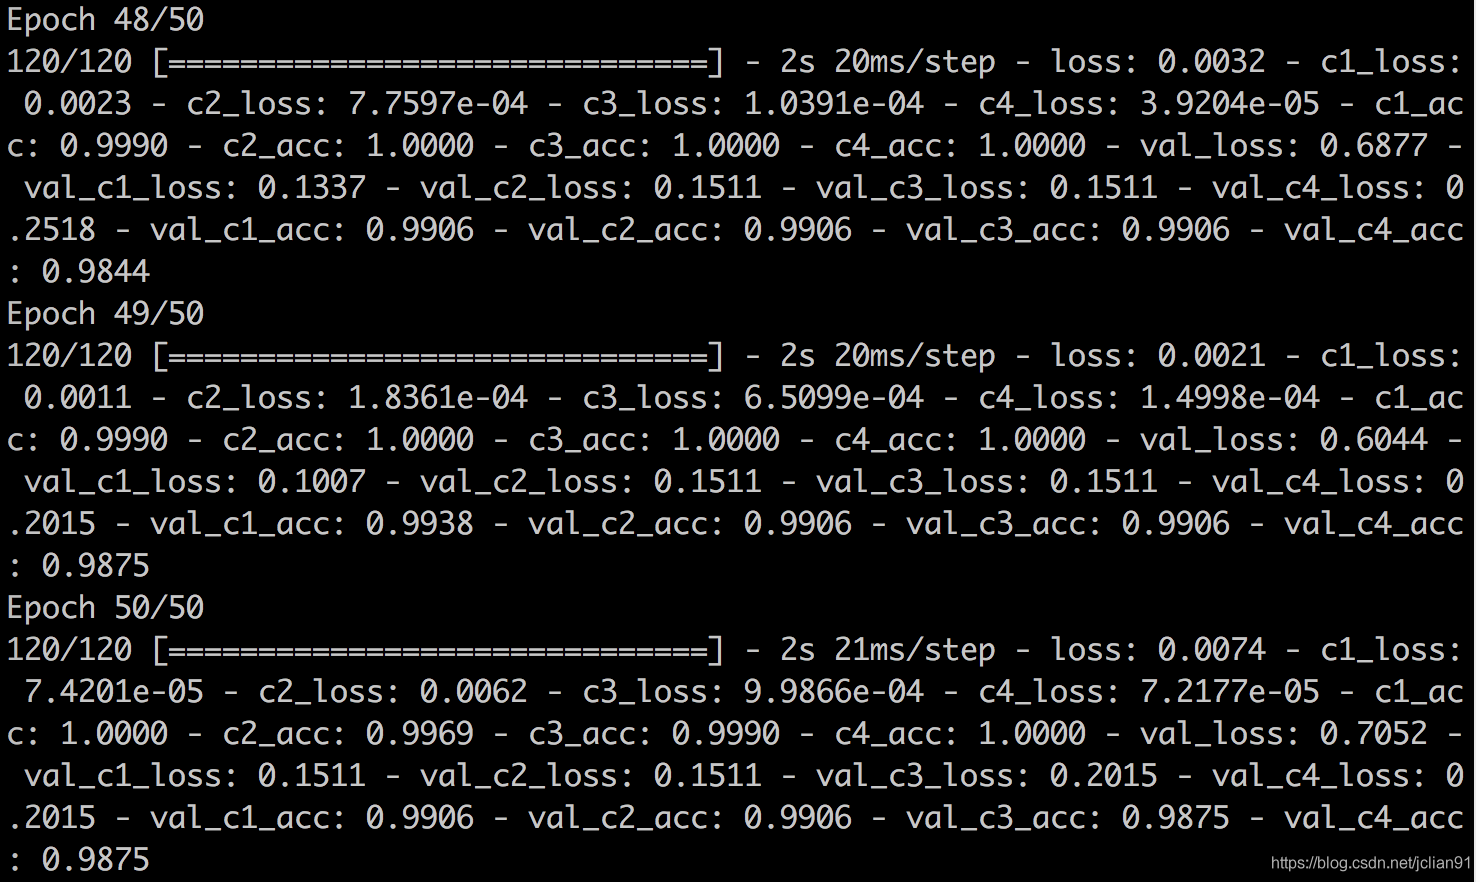
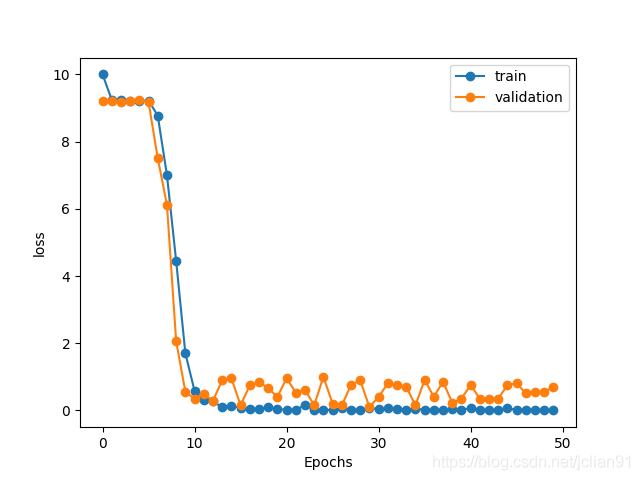
总的损失值图像如下:
四个数字每个数字的损失值图像如下:
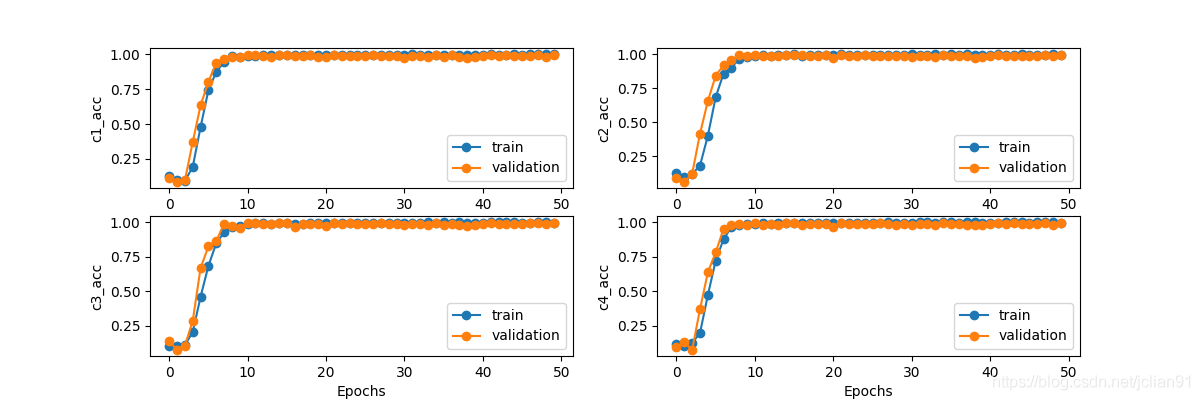
训练完后,程序会将训练效果最好的epoch保存为best_model.h5文件,便于后续的模型预测。由输出的结果及图像来看,该CNN模型的训练效果应该是相当好的,下面,我们来看看对新验证码的预测效果。

模型预测

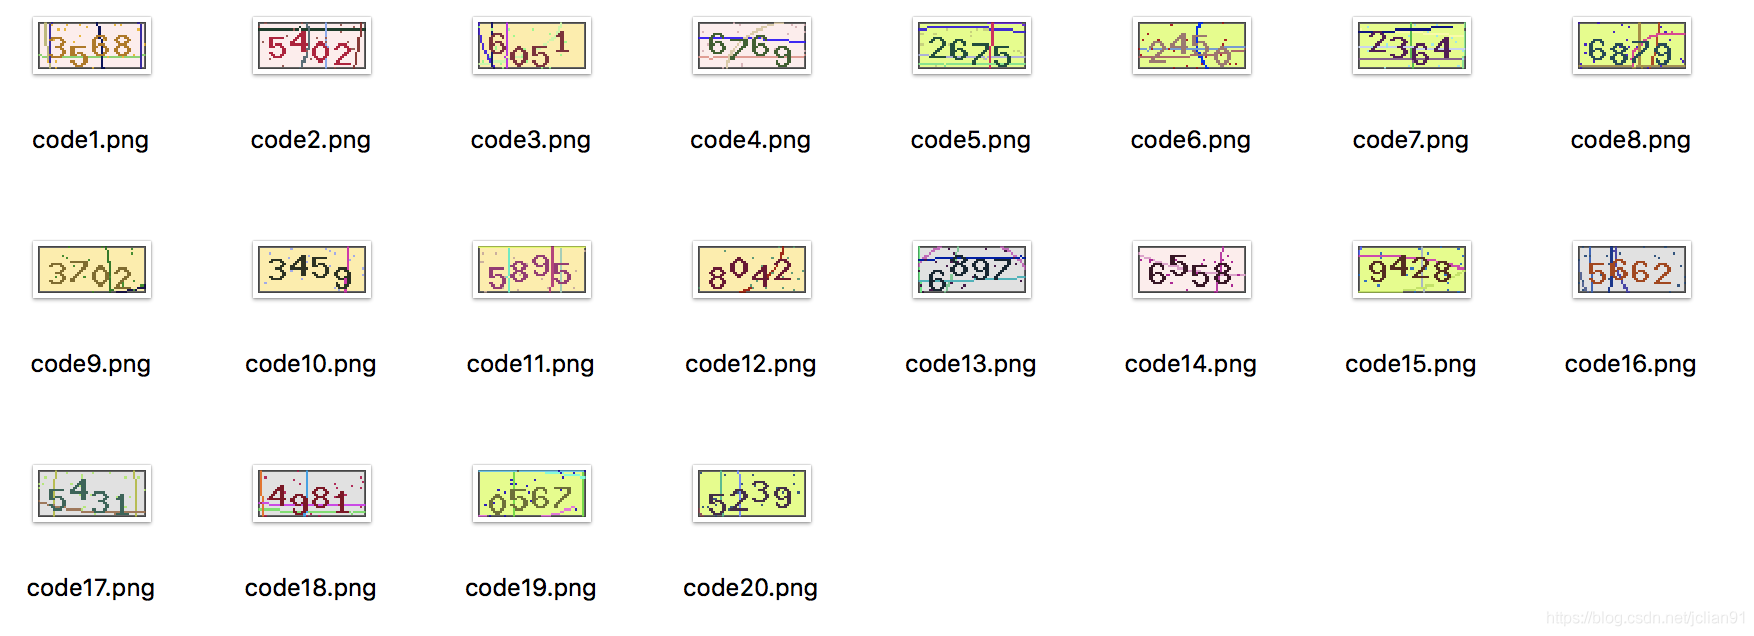
新的验证码共有20张,如下:
模型预测的Python代码如下:

1
2
3
4
5
6
7
8
9
10
11
12
13
14
15
16
17
18
19
20
21
22
23
24
25
26
27
# 使用训练好的CNN模型对新图片进行预测

# -*- coding: utf-8 -*-
from keras.models import load_model
import cv2
import numpy as np

# 导入训练好的模型
model = load_model('best_model.h5')

batch_size = 20
width, height, n_len, n_class = 50, 22, 4, 10

# 导入验证码数据并进行预测
X = np.zeros((batch_size, height, width, 3), dtype=np.uint8)

for i in range(batch_size):
X_test = cv2.imread('./new_image/code%d.png' %(i+1), 1)
X[i] = X_test

y_pred = model.predict(X)
y_pred = np.argmax(y_pred, axis=2)

# 输出每张验证码的预测结果
for i in range(batch_size):
print('第%d张验证码的识别结果为:' %(i+1), end='')
print(''.join(map(str, y_pred[:, i].tolist())))

运行该模型,得到的输出结果如下:

1
2
3
4
5
6
7
8
9
10
11
12
13
14
15
16
17
18
19
20
第1张验证码的识别结果为:3568
第2张验证码的识别结果为:5402
第3张验证码的识别结果为:6051
第4张验证码的识别结果为:6769
第5张验证码的识别结果为:2675
第6张验证码的识别结果为:2450
第7张验证码的识别结果为:2364
第8张验证码的识别结果为:6879
第9张验证码的识别结果为:3702
第10张验证码的识别结果为:3459
第11张验证码的识别结果为:5895
第12张验证码的识别结果为:8042
第13张验证码的识别结果为:6897
第14张验证码的识别结果为:6558
第15张验证码的识别结果为:9428
第16张验证码的识别结果为:5662
第17张验证码的识别结果为:5431
第18张验证码的识别结果为:4981
第19张验证码的识别结果为:0567
第20张验证码的识别结果为:5239

对这20张新的验证码,预测完全正确!不得不说,CNN模型的识别效果非常好!

总结

本文采用了一种新的思路,搭建CNN模型来实现验证码的识别,取得了不错的识别效果,而且识别的验证码是从网页中下载下来的,具有实际背景,增强了该项目的应用性。

本项目已放至Github,地址为:https://github.com/percent4/CAPTCHA-Recognizition

欢迎关注我的公众号NLP奇幻之旅,原创技术文章第一时间推送。

欢迎关注我的知识星球“自然语言处理奇幻之旅”,笔者正在努力构建自己的技术社区。


Keras入门(四)利用CNN模型轻松破解网站验证码
https://percent4.github.io/Keras入门(四)利用CNN模型轻松破解网站验证码/
作者
Jclian91
发布于
2023年8月6日
许可协议