# Configure logfire instrumentation. logfire.configure( service_name='my_agent_service', send_to_logfire=False ) # This method automatically patches the OpenAI Agents SDK to send logs via OTLP to Langfuse. logfire.instrument_openai_agents()
asyncdefrun(mcp_server: MCPServer): agent = Agent( name="File System Assistant", model="gpt-4o", instructions="Use the tools to read, write, and search the filesystem and answer questions based on those files.", mcp_servers=[mcp_server], )
asyncwith MCPServerStdio( name="Filesystem Server, via npx", params={ "command": "npx", "args": ["-y", "@modelcontextprotocol/server-filesystem", samples_dir], }, ) as server: await run(server)
if __name__ == "__main__": # Let's make sure the user has npx installed ifnot shutil.which("npx"): raise RuntimeError("npx is not installed. Please install it with `npm install -g npx`.")
asyncio.run(main())
上述脚本的输出结果如下:
1
2
3
4
5
6
7
8
9
10
11
12
13
14
15
16
17
18
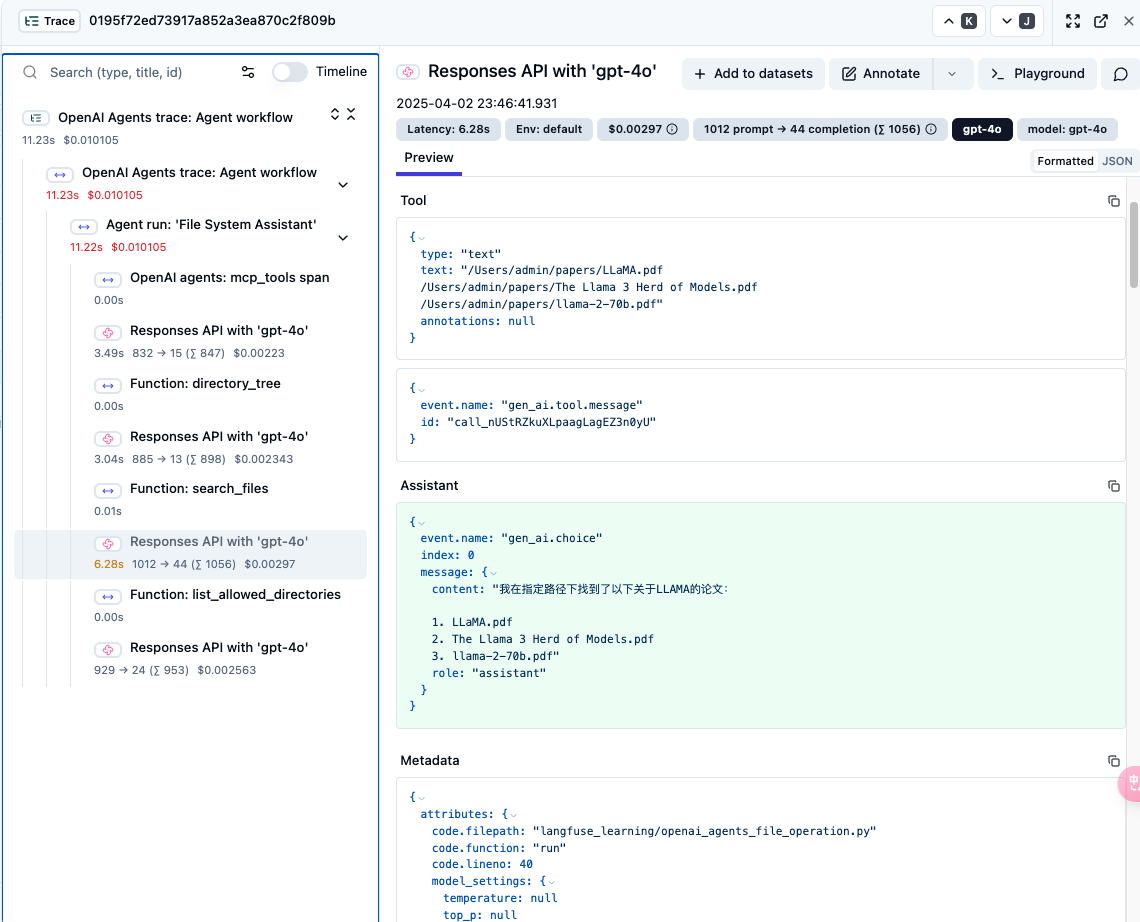
Secure MCP Filesystem Server running on stdio
Allowed directories: [ '/Users/admin/papers' ]
Running: 帮我找下这个路径下面的所有关于LLAMA的论文
15:46:36.985 OpenAI Agents trace: Agent workflow
15:46:36.986   Agent run: 'File System Assistant'
15:46:36.986     OpenAI agents: mcp_tools span
15:46:37.007     Responses API with 'gpt-4o'
15:46:40.497     Function: directory_tree
15:46:40.500     Responses API with 'gpt-4o'
15:46:43.545     Function: list_allowed_directories
15:46:43.549     Responses API with 'gpt-4o'
15:46:46.215     Function: search_files
15:46:46.226     Responses API with 'gpt-4o'
我在指定路径下找到了以下关于LLAMA的论文:

1. LLaMA.pdf
2. The Llama 3 Herd of Models.pdf
3. llama-2-70b.pdf
# Configure logfire instrumentation. logfire.configure( service_name='my_agent_service', send_to_logfire=False ) # This method automatically patches the OpenAI Agents SDK to send logs via OTLP to Langfuse. logfire.instrument_openai_agents()
asyncdefrun(mcp_server_1: MCPServer, mcp_server_2: MCPServer): agent = Agent( name="File System Assistant", model="gpt-4o", instructions="Use the tools to read, write, and search the filesystem and answer questions based on those files.", mcp_servers=[mcp_server_1, mcp_server_2], )
asyncwith file_server as file_server, redis_server as redis_server: await run(file_server, redis_server)
if __name__ == "__main__": # Let's make sure the user has npx installed ifnot shutil.which("npx"): raise RuntimeError("npx is not installed. Please install it with `npm install -g npx`.")
asyncio.run(main())
运行上述脚本,输出结果如下:
1
2
3
4
5
6
7
8
9
10
11
12
13
14
15
16
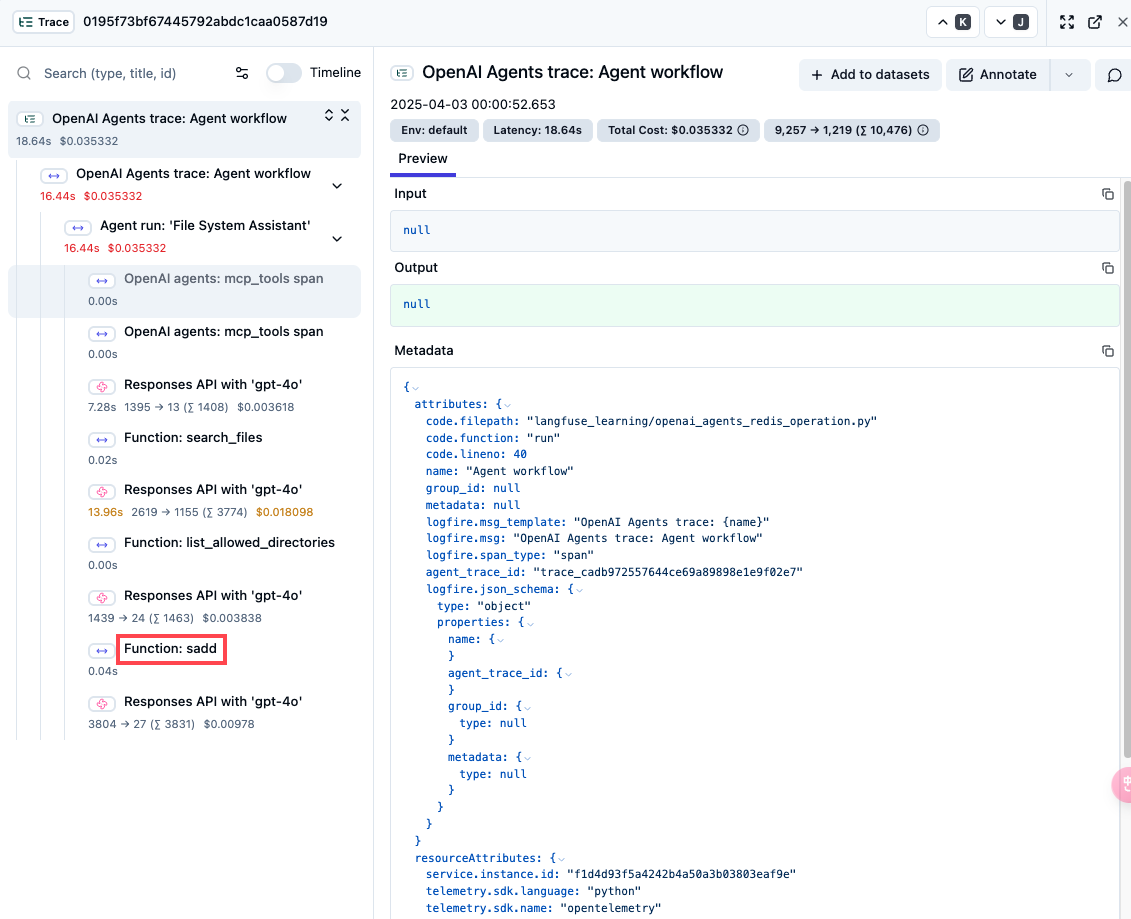
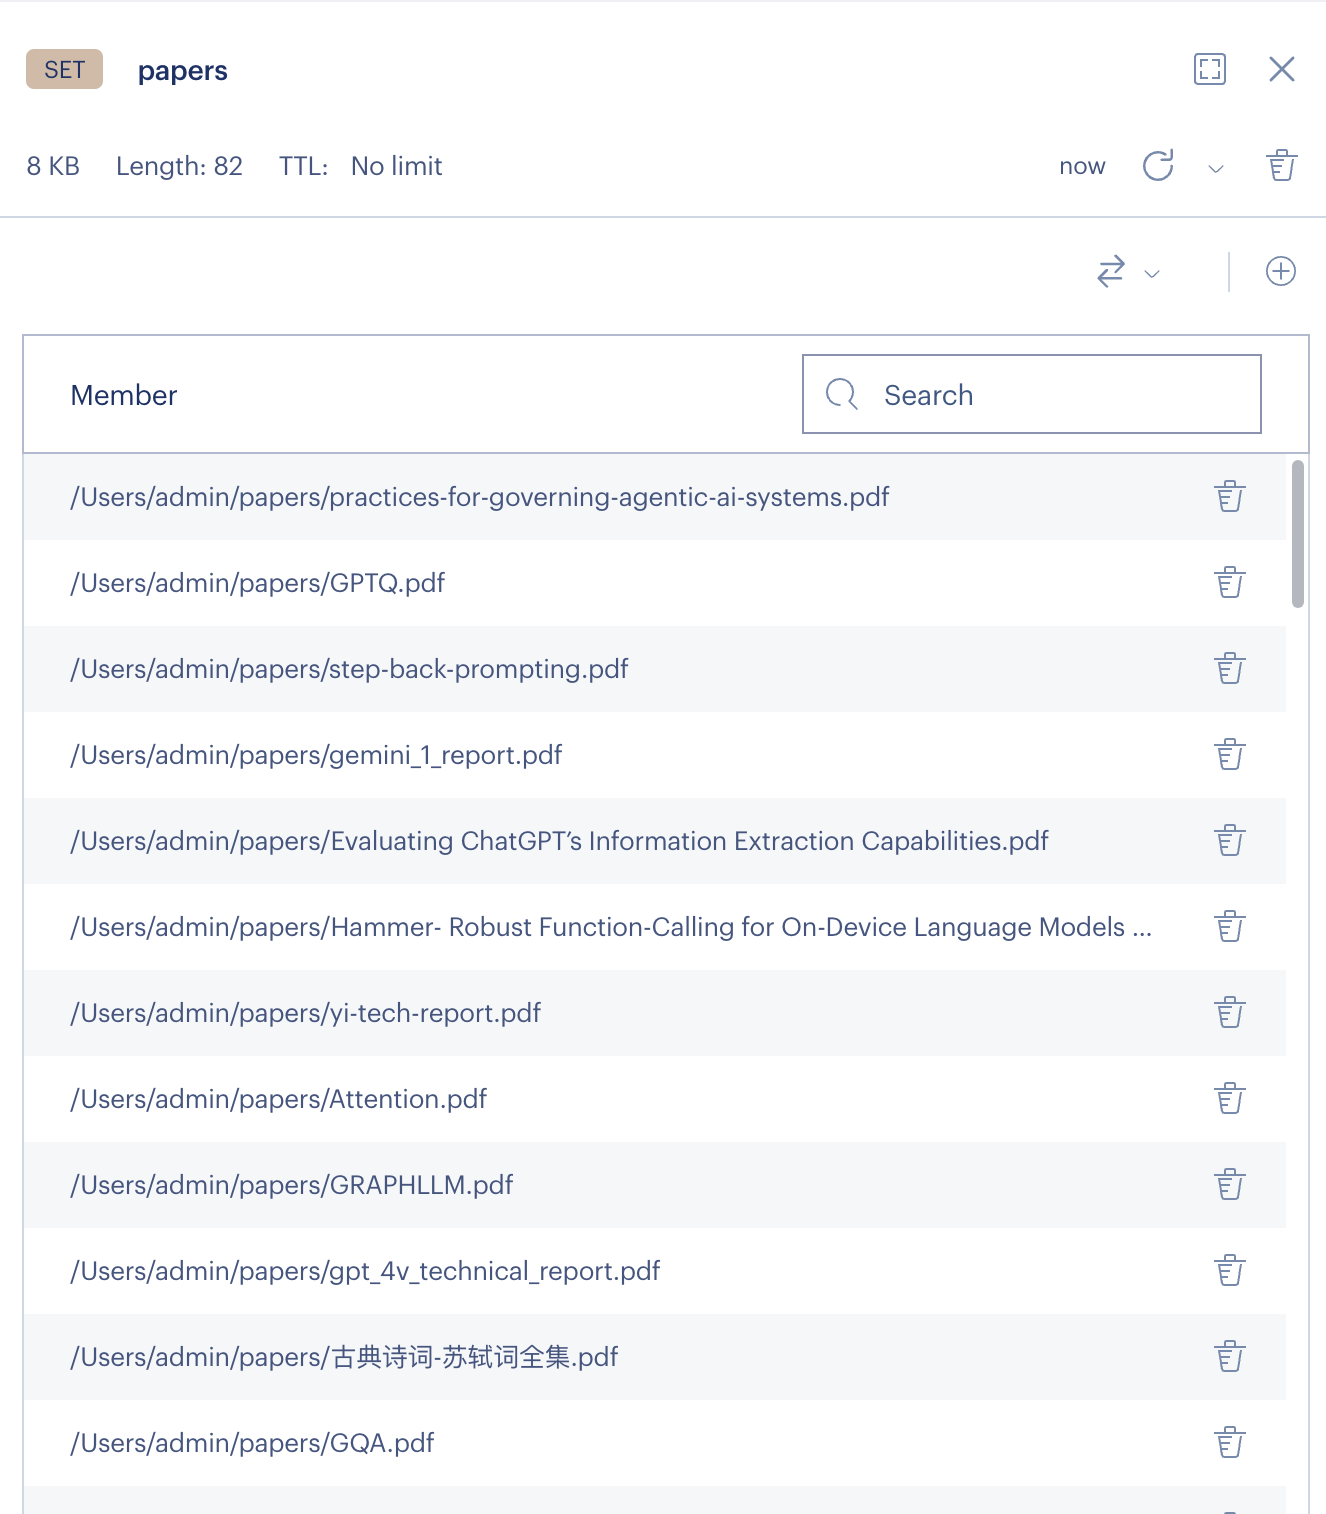
Secure MCP Filesystem Server running on stdio
Allowed directories: [ '/Users/admin/papers' ]
npm WARN exec The following package was not found and will be installed: redis-mcp@0.0.4
Running: 将所有这个路径下的PDF论文的绝对路径,都保存至redis中db为0, key=papers中的set中。
16:00:56.948 OpenAI Agents trace: Agent workflow
16:00:56.950   Agent run: 'File System Assistant'
16:00:56.950     OpenAI agents: mcp_tools span
16:00:56.954     OpenAI agents: mcp_tools span
16:00:56.973     Responses API with 'gpt-4o'
16:00:59.962     Function: list_allowed_directories
16:00:59.964     Responses API with 'gpt-4o'
16:01:01.559     Function: search_files
16:01:01.578     Responses API with 'gpt-4o'
16:01:11.254     Function: sadd
16:01:11.294     Responses API with 'gpt-4o'
已将路径下所有PDF论文的绝对路径保存至 Redis 中,键为 `papers` 的集合中。
# Configure logfire instrumentation. logfire.configure( service_name='my_agent_service', send_to_logfire=False ) # This method automatically patches the OpenAI Agents SDK to send logs via OTLP to Langfuse. logfire.instrument_openai_agents()
asyncdefrun(mcp_server: MCPServer): agent = Agent( name="Assistant", instructions="Use the tools to answer the questions.", mcp_servers=[mcp_server], model_settings=ModelSettings(tool_choice="required"), )
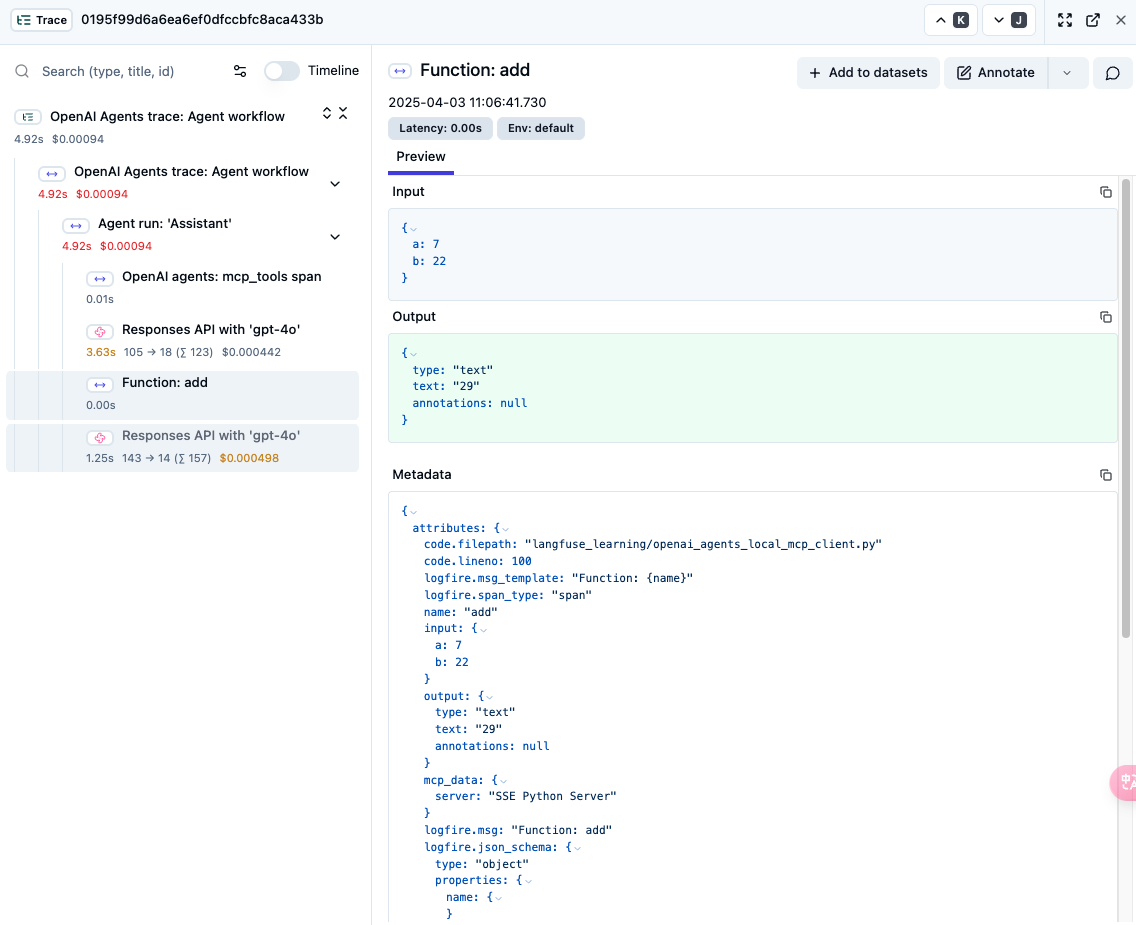
# Use the `add` tool to add two numbers message = "Add these numbers: 7 and 22." print(f"Running: {message}") result = await Runner.run(starting_agent=agent, input=message) print(result.final_output)
# Run the `get_weather` tool message = "What's the weather in Shanghai?" print(f"\n\nRunning: {message}") result = await Runner.run(starting_agent=agent, input=message) print(result.final_output)
# Run the `get_secret_word` tool message = "What's the secret word?" print(f"\n\nRunning: {message}") result = await Runner.run(starting_agent=agent, input=message) print(result.final_output)
if __name__ == "__main__": # Let's make sure the user has uv installed ifnot shutil.which("uv"): raise RuntimeError( "uv is not installed. Please install it: https://docs.astral.sh/uv/getting-started/installation/" )
# We'll run the SSE server in a subprocess. Usually this would be a remote server, but for this # demo, we'll run it locally at http://localhost:8000/sse process: subprocess.Popen[Any] | None = None try: this_dir = os.path.dirname(os.path.abspath(__file__)) server_file = os.path.join(this_dir, "openai_agents_local_mcp_server.py")
print("Starting SSE server at http://localhost:8000/sse ...")
# Run `uv run server.py` to start the SSE server process = subprocess.Popen(["uv", "run", server_file]) # Give it 3 seconds to start time.sleep(3)
print("SSE server started. Running example...\n\n") except Exception as e: print(f"Error starting SSE server: {e}") exit(1)
try: asyncio.run(main()) finally: if process: process.terminate()
Starting SSE server at http://localhost:8000/sse ... INFO: Started server process [97601] INFO: Waiting for application startup. INFO: Application startup complete. INFO: Uvicorn running on http://0.0.0.0:8000 (Press CTRL+C to quit) SSE server started. Running example...
INFO: 127.0.0.1:59992 - "GET /sse HTTP/1.1" 200 OK INFO: 127.0.0.1:59994 - "POST /messages/?session_id=8ef9d738e0b249cf81e70ba029c0fb77 HTTP/1.1" 202 Accepted Running: Add these numbers: 7 and 22. 03:06:38.062 OpenAI Agents trace: Agent workflow 03:06:38.063 Agent run: 'Assistant' 03:06:38.063 OpenAI agents: mcp_tools span INFO: 127.0.0.1:59994 - "POST /messages/?session_id=8ef9d738e0b249cf81e70ba029c0fb77 HTTP/1.1" 202 Accepted INFO: 127.0.0.1:59994 - "POST /messages/?session_id=8ef9d738e0b249cf81e70ba029c0fb77 HTTP/1.1" 202 Accepted [04/03/25 11:06:38] INFO Processing request of type ListToolsRequest server.py:534 03:06:38.093 Responses API with 'gpt-4o' 03:06:41.730 Function: add INFO: 127.0.0.1:59994 - "POST /messages/?session_id=8ef9d738e0b249cf81e70ba029c0fb77 HTTP/1.1" 202 Accepted [04/03/25 11:06:41] INFO Processing request of type CallToolRequest server.py:534 [debug-server] add(7, 22) 03:06:41.735 Responses API with 'gpt-4o' The sum of 7 and 22 is 29.
Running: What's the weather in Shanghai? 03:06:42.987 OpenAI Agents trace: Agent workflow 03:06:42.987 Agent run: 'Assistant' 03:06:42.988 OpenAI agents: mcp_tools span INFO: 127.0.0.1:59994 - "POST /messages/?session_id=8ef9d738e0b249cf81e70ba029c0fb77 HTTP/1.1" 202 Accepted [04/03/25 11:06:42] INFO Processing request of type ListToolsRequest server.py:534 03:06:42.995 Responses API with 'gpt-4o' 03:06:43.936 Function: get_current_weather INFO: 127.0.0.1:59994 - "POST /messages/?session_id=8ef9d738e0b249cf81e70ba029c0fb77 HTTP/1.1" 202 Accepted [04/03/25 11:06:43] INFO Processing request of type CallToolRequest server.py:534 [debug-server] get_current_weather(Shanghai) 03:06:45.572 Responses API with 'gpt-4o' ### Current Weather in Shanghai: - **Condition:** Sunny - **Temperature:** 14°C (feels like 13°C) - **Wind:** 13 km/h ← - **Visibility:** 10 km - **Precipitation:** 0.0 mm
Running: What's the secret word? 03:06:48.980 OpenAI Agents trace: Agent workflow 03:06:48.981 Agent run: 'Assistant' 03:06:48.982 OpenAI agents: mcp_tools span INFO: 127.0.0.1:60084 - "POST /messages/?session_id=8ef9d738e0b249cf81e70ba029c0fb77 HTTP/1.1" 202 Accepted [04/03/25 11:06:48] INFO Processing request of type ListToolsRequest server.py:534 03:06:48.991 Responses API with 'gpt-4o' 03:06:49.755 Function: [Scrubbed due to 'secret'] INFO: 127.0.0.1:60084 - "POST /messages/?session_id=8ef9d738e0b249cf81e70ba029c0fb77 HTTP/1.1" 202 Accepted [04/03/25 11:06:49] INFO Processing request of type CallToolRequest server.py:534 [debug-server] get_secret_word() 03:06:49.762 Responses API with 'gpt-4o' The secret word is "apple." INFO: Shutting down INFO: Waiting for background tasks to complete.
# Create server mcp = FastMCP("Music Play Server")
@mcp.tool() defplay_music(music_file_path: str): """ Play a music file. Args: music_file_path: The absolute path to the music file to play. Returns: A message indicating that the music is playing. """ print(f"[debug-server] play_music({music_file_path})") os.system(f"play {music_file_path}") returnf"Playing {music_file_path}"
if __name__ == "__main__": mcp.run(transport="sse")
# Configure logfire instrumentation. logfire.configure( service_name='my_agent_service', send_to_logfire=False ) # This method automatically patches the OpenAI Agents SDK to send logs via OTLP to Langfuse. logfire.instrument_openai_agents()
asyncdefrun(mcp_server1: MCPServer, mcp_server2: MCPServer): agent = Agent( name="Assistant", instructions="Use the tools to help me create a music operation.", mcp_servers=[mcp_server1, mcp_server2], model_settings=ModelSettings(tool_choice="required"), )
# Use the `add` tool to add two numbers message = "给我播放这个目录下的小情歌这首歌曲。" print(f"Running: {message}") result = await Runner.run(starting_agent=agent, input=message) print(result.final_output)
asyncwith music_server as mcp_server1, file_system_server as mcp_server2: await run(mcp_server1=mcp_server1, mcp_server2=mcp_server2)
if __name__ == "__main__": # Let's make sure the user has uv installed ifnot shutil.which("uv"): raise RuntimeError( "uv is not installed. Please install it: https://docs.astral.sh/uv/getting-started/installation/" )
# We'll run the SSE server in a subprocess. Usually this would be a remote server, but for this # demo, we'll run it locally at http://localhost:8000/sse process: subprocess.Popen[Any] | None = None try: this_dir = os.path.dirname(os.path.abspath(__file__)) server_file = os.path.join(this_dir, "openai_agents_music_server.py")
print("Starting SSE server at http://localhost:8000/sse ...")
# Run `uv run server.py` to start the SSE server process = subprocess.Popen(["uv", "run", server_file]) # Give it 3 seconds to start time.sleep(3)
print("SSE server started. Running example...\n\n") except Exception as e: print(f"Error starting SSE server: {e}") exit(1)
try: asyncio.run(main()) finally: if process: process.terminate()
Starting SSE server at http://localhost:8000/sse ...
INFO:     Started server process [28954]
INFO:     Waiting for application startup.
INFO:     Application startup complete.
INFO:     Uvicorn running on http://0.0.0.0:8000 (Press CTRL+C to quit)
SSE server started. Running example...


INFO:     127.0.0.1:53841 - "GET /sse HTTP/1.1" 200 OK
INFO:     127.0.0.1:53843 - "POST /messages/?session_id=2fcc60b6348a4b60aee082a79dba8faa HTTP/1.1" 202 Accepted
INFO:     127.0.0.1:53843 - "POST /messages/?session_id=2fcc60b6348a4b60aee082a79dba8faa HTTP/1.1" 202 Accepted
Secure MCP Filesystem Server running on stdio
Allowed directories: [ '/Users/admin/Music/my_music' ]
Running: 给我播放这个目录下的小情歌这首歌曲。
12:01:24.716 OpenAI Agents trace: Agent workflow
12:01:24.717   Agent run: 'Assistant'
12:01:24.718     OpenAI agents: mcp_tools span
INFO:     127.0.0.1:53843 - "POST /messages/?session_id=2fcc60b6348a4b60aee082a79dba8faa HTTP/1.1" 202 Accepted
[04/03/25 20:01:24] INFO     Processing request of type ListToolsRequest                                                              server.py:534
12:01:24.724     OpenAI agents: mcp_tools span
12:01:24.745     Responses API with 'gpt-4o'
12:01:28.638     Function: list_allowed_directories
12:01:28.640     Responses API with 'gpt-4o'
12:01:29.854     Function: search_files
12:01:29.861     Responses API with 'gpt-4o'
12:01:31.216     Function: play_music
INFO:     127.0.0.1:53855 - "POST /messages/?session_id=2fcc60b6348a4b60aee082a79dba8faa HTTP/1.1" 202 Accepted
[04/03/25 20:01:31] INFO     Processing request of type CallToolRequest                                                               server.py:534
[debug-server] play_music(/Users/admin/Music/my_music/小情歌_苏打绿.mp3)

/Users/admin/Music/my_music/小情歌_苏打绿.mp3:

 File Size: 4.38M     Bit Rate: 128k
  Encoding: MPEG audio
  Channels: 2 @ 16-bit
Samplerate: 44100Hz
Replaygain: off
  Duration: 00:04:33.67

In:100%  00:04:33.63 [00:00:00.03] Out:13.1M [      |      ]        Clip:6
play WARN rate: rate clipped 3 samples; decrease volume?
play WARN sox: `coreaudio' output clipped 3 samples; decrease volume?
Done.
12:06:05.160     Responses API with 'gpt-4o'
正在播放《小情歌》 by 苏打绿。享受音乐吧!🎵
INFO:     Shutting down
INFO:     Waiting for background tasks to complete.