本文将介绍CLIP模型,以及CLIP模型的简单使用和它在CIFAR-10数据集上的实验结果复现。
从这篇文章开始,我们将进入一个崭新的世界:多模态(Multi-Modal)模型。
简介
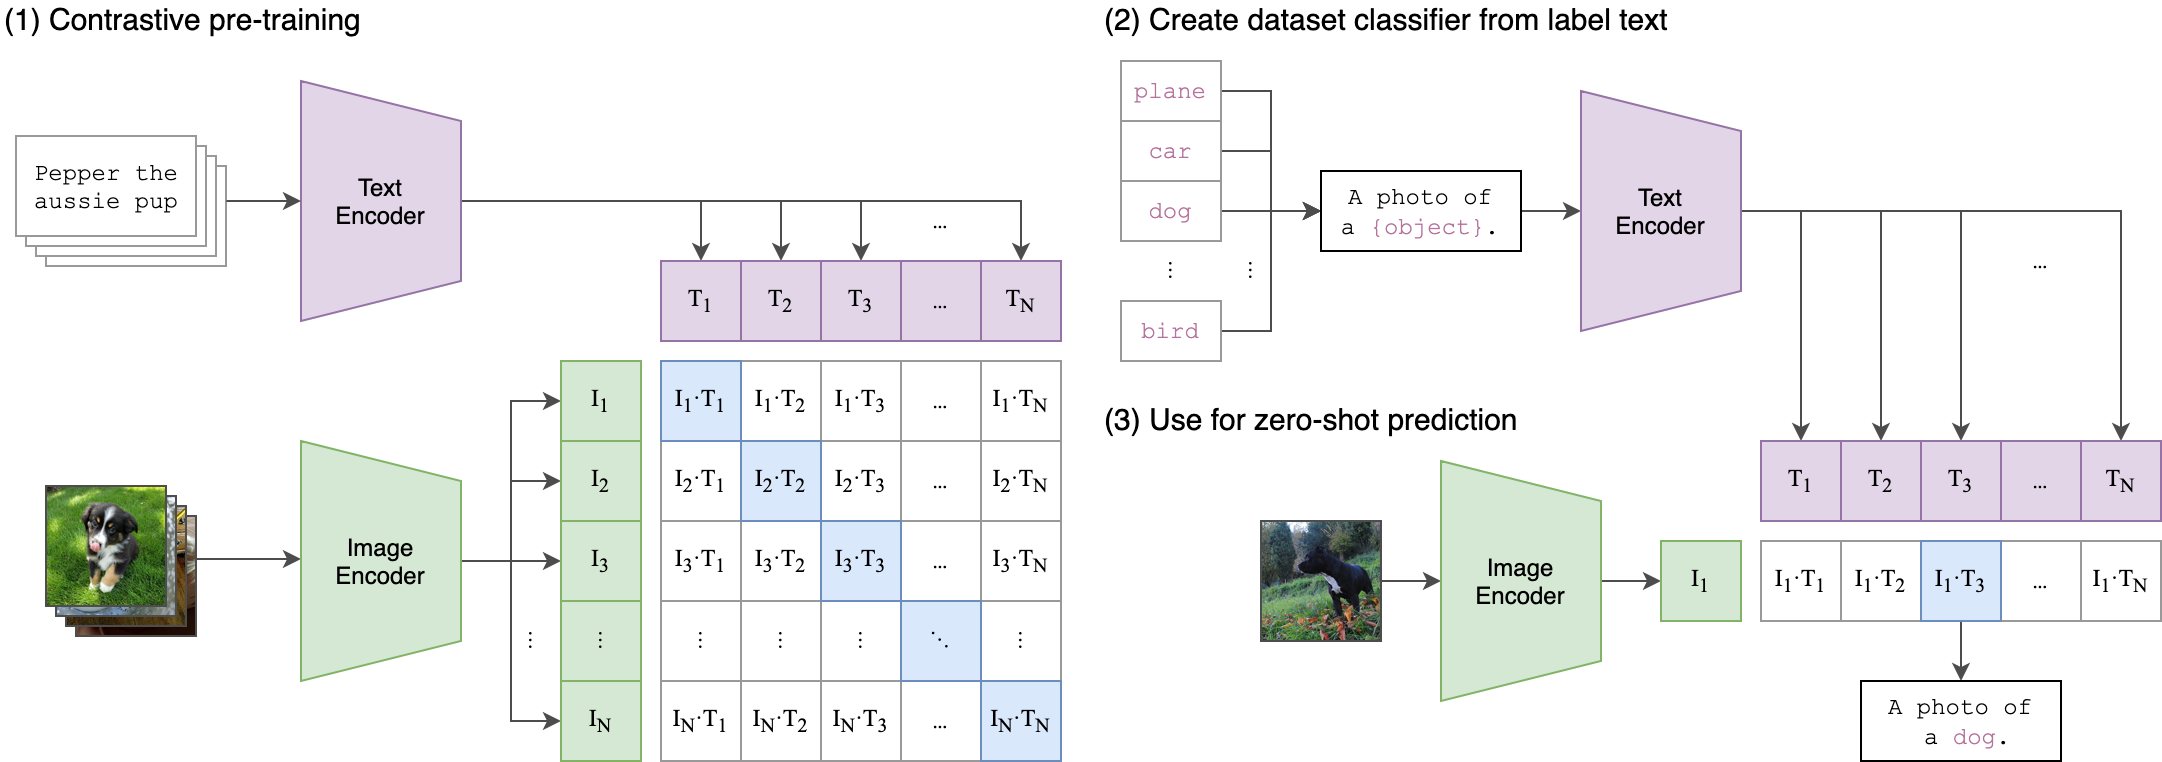
CLIP(Contrastive Language-Image Pre-Training)是OpenAI在2021年初发布的多模态预训练神经网络模型,用于匹配图像和文本。该模型的关键创新之一是将图像和文本映射到统一的向量空间,通过对比学习的方式进行预训练,使得模型能够直接在向量空间中计算图像和文本之间的相似性,无需额外的中间表示。
CLIP模型训练分为三个阶段:
对比式预训练阶段:使用图像-文本对进行对比学习训练;
从标签文本创建数据集分类器:提取预测类别文本特征;
用于零样本预测:进行零样本推理预测。
CLIP的设计灵感在于将图像和文本映射到共享的向量空间,使得模型能够理解它们之间的语义关系。这种共享向量空间使得CLIP实现了无监督的联合学习,可用于各种视觉和语言任务。CLIP可用于多种任务,如分类图像 、生成文本描述 、检索图像 等。它具有出色的zero-shot学习能力,只需简单的线性分类器(Linear Probe)或最近邻搜索(KNN)即可完成任务,无需额外训练或微调。
简单使用
使用CLIP模型可以很方便地实现零样本图片分类(Zero Shot Image Classification),广泛效果好,且图片类别(labels)可以自由定义。从这种意义上来讲,它改变了以前CV界关于图片分类的范式,是真正意义上的创新。
应用入门
以下是使用Hugging Face来使用CLIP模型实现零样本图片分类的Python代码:
1
2
3
4
5
6
7
from PIL import Imageimport requestsfrom transformers import CLIPProcessor, CLIPModel"/data-ai/usr/lmj/models/clip-vit-base-patch32"
1
2
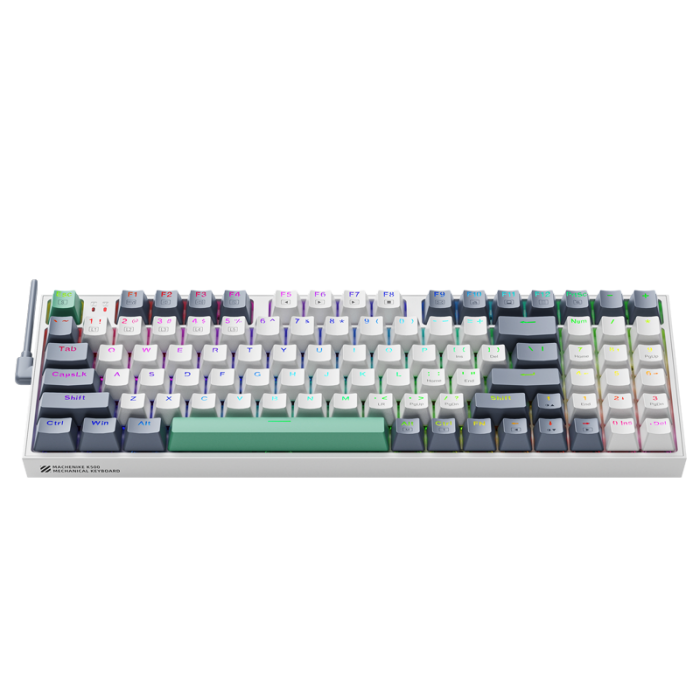
url = "https://static.jixieshi.cn/upload/goods/2022042210295380594_BIG.png" open (requests.get(url, stream=True ).raw)
1
2
3
4
5
text = ["a photo of a computer" , "a photo of a mouse" , "a photo of a keyboard" , "a photo of a cellphone" ]"pt" , padding=True )
tensor([[23.6426, 20.7598, 28.2721, 17.9425]], grad_fn=<TBackward0>)
1 probs = logits_per_image.softmax(dim=1 )
1 probs.detach().numpy().tolist()
[[0.009659518487751484,
  0.000540732522495091,
  0.9897673726081848,
  3.2318232115358114e-05]]
可视化应用
以下是使用Gradio工具来构建零样本图片分类的Python代码:
1 2 3 4 5 6 7 8 9 10 11 12 13 14 15 16 17 18 19 20 21 22 23 24 25 26 27 28 29 30 31 32 33 34 35 36 37 38 39 40 41 42 43 44 45 46 47 48 49 50 51 52 53 import pandas as pdimport gradio as grfrom PIL import Imageimport requestsfrom transformers import CLIPProcessor, CLIPModel"./models/clip-vit-base-patch32" print ("load model..." )def image_predict (image_url, prompts ):open (requests.get(image_url, stream=True ).raw)',' )"pt" , padding=True )1 ).detach().numpy().tolist()[0 ]return image, gr.BarPlot("label" : labels,"prob" : probs,"label" ,"prob" ,400 ,'label' ,"Zero Shot Image Classification" ,"label" , "prob" ],0 , 1 ]if __name__ == '__main__' :with gr.Blocks() as demo:with gr.Row():with gr.Column():1 , placeholder="Enter image urls" , label="Images" )3 , placeholder="Enter labels, separated by comma" , label="Labels" )with gr.Column():type ='pil' )"Classify" )"0.0.0.0" , server_port=50073 )
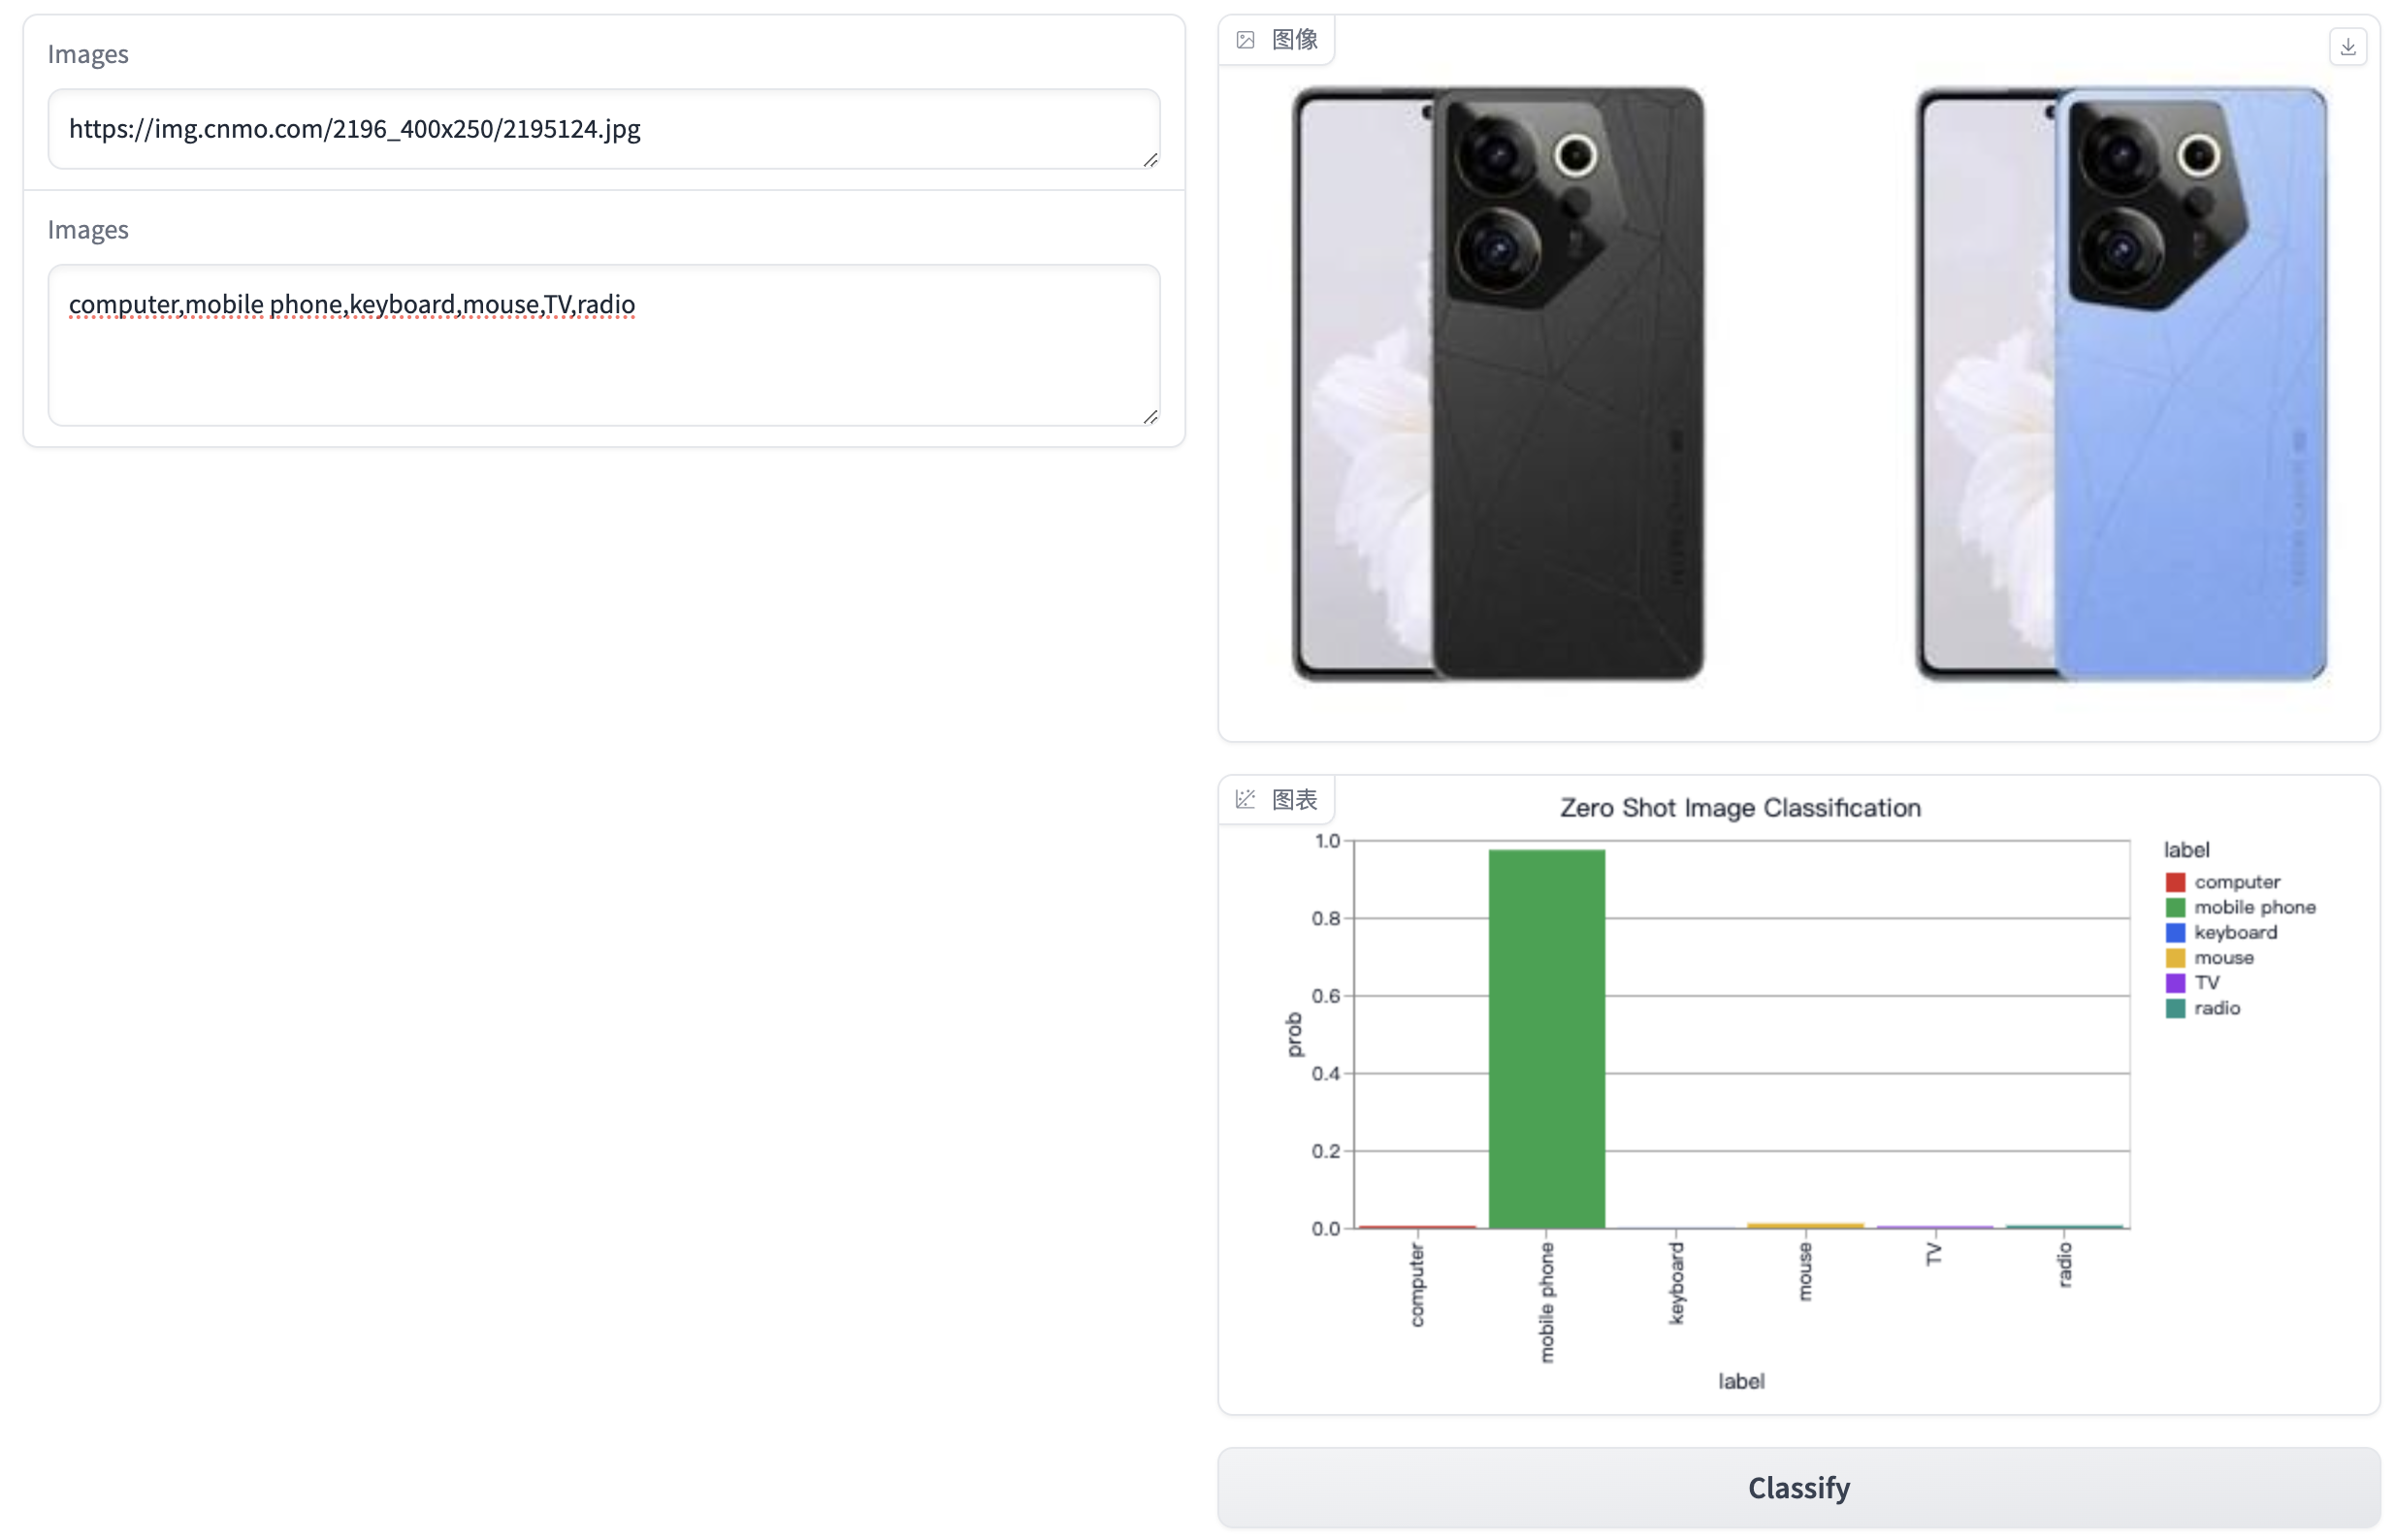
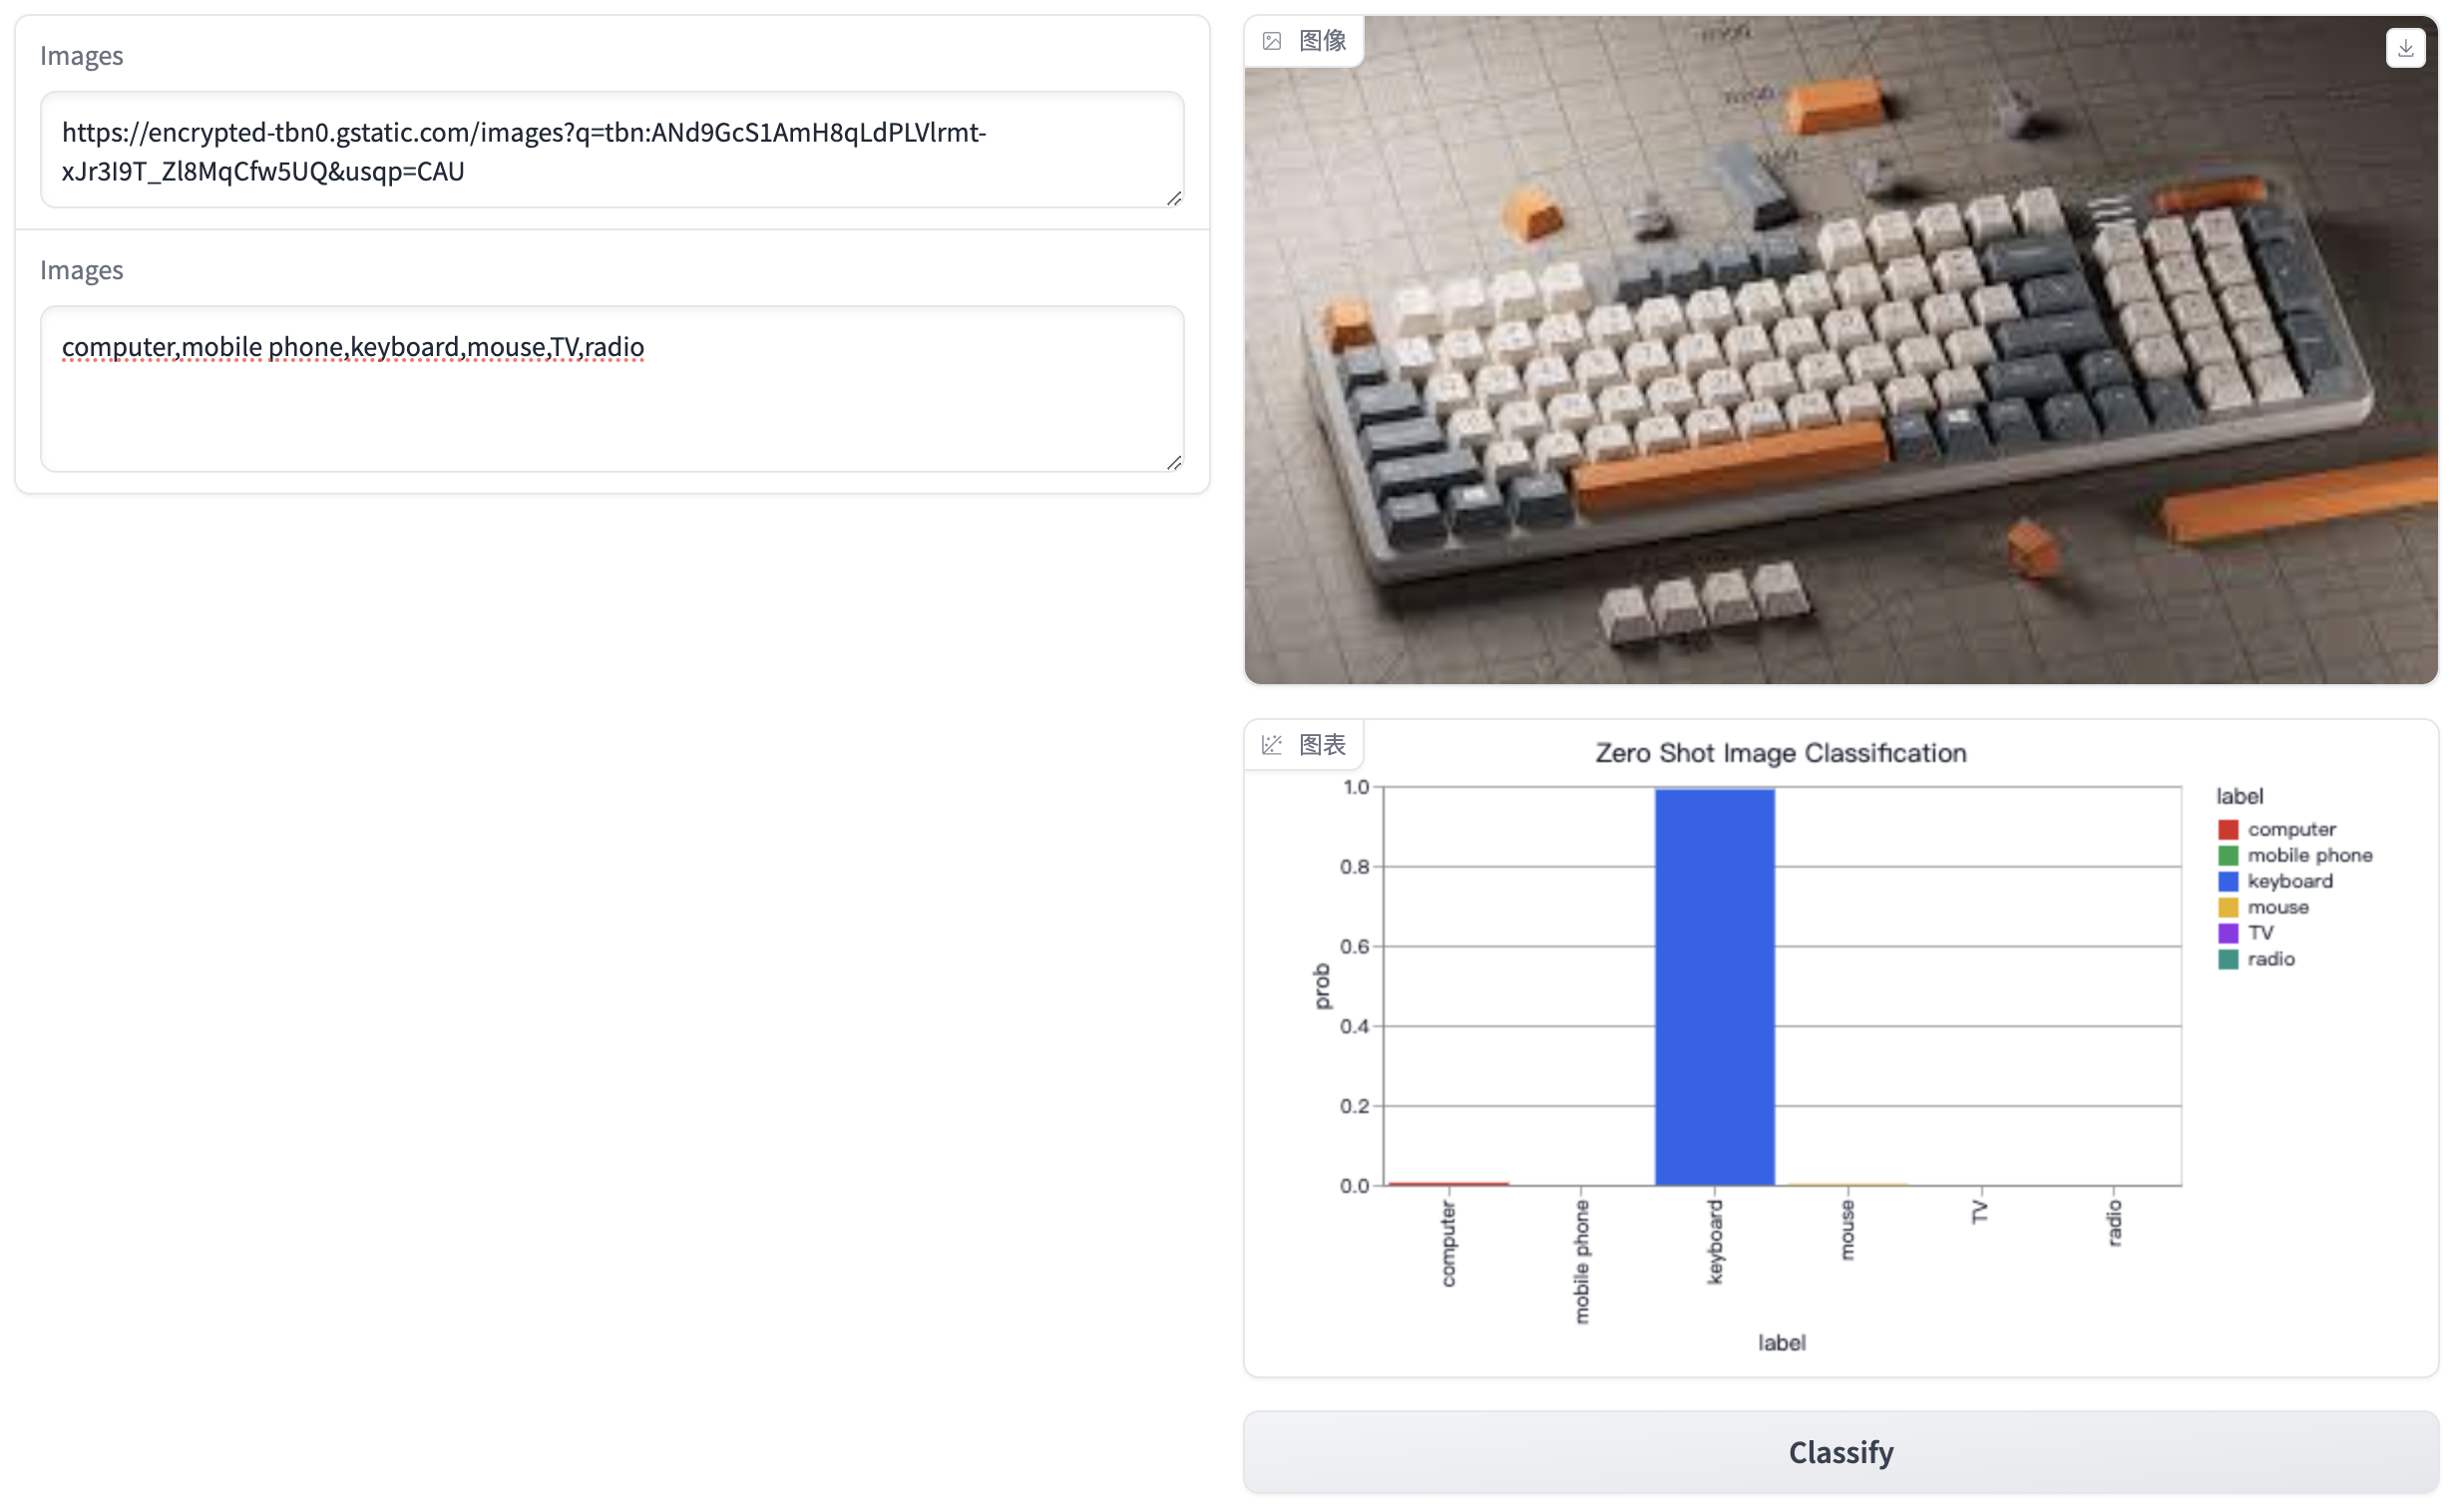
效果图如下:
在CIFAR-10的结果复现
在CLIP论文中,给出了它在27个传统CV领域的数据集上的表现,本文仅复现CLIP模型在CIFAR-10数据集的效果。
CIFAR-10是一个带有标签的数据集,由10类32×32的彩色图像组成。数据集共有60,000张图像,每类6,000张,其中50,000张用于训练,10,000张用于测试。CIFAR-10数据集由Alex Krizhevsky, Vinod Nair, Geoffrey Hinton创建,用于识别常见物体。每个图像都是RGB格式的,每个类别内的图像数量相等,但训练批次内的图像数量可能不同。数据集支持Python、Matlab和C语言版本,并且已经预先分割成了5个训练批次和1个测试批次。其官方访问网址为:https://www.cs.toronto.edu/~kriz/cifar.html
Zero Shot Image Classification
1
2
3
from datasets import load_dataset'cifar10' , split='test' )
1
2
for _ in cifar_10_test.select(range (5 )):print (_)
{'img': <PIL.PngImagePlugin.PngImageFile image mode=RGB size=32x32 at 0x7F5891C2B1F0>, 'label': 3}
{'img': <PIL.PngImagePlugin.PngImageFile image mode=RGB size=32x32 at 0x7F5890261420>, 'label': 8}
{'img': <PIL.PngImagePlugin.PngImageFile image mode=RGB size=32x32 at 0x7F5CACB33670>, 'label': 8}
{'img': <PIL.PngImagePlugin.PngImageFile image mode=RGB size=32x32 at 0x7F5890261420>, 'label': 0}
{'img': <PIL.PngImagePlugin.PngImageFile image mode=RGB size=32x32 at 0x7F5CACB33640>, 'label': 6}
1
2
3
labels = cifar_10_test.features['label' ].namesdict (zip (labels, range (len (labels))))dict (zip (range (len (labels)), labels))
['airplane',
 'automobile',
 'bird',
 'cat',
 'deer',
 'dog',
 'frog',
 'horse',
 'ship',
 'truck']
1
2
3
4
from PIL import Imageimport requestsfrom transformers import CLIPProcessor, CLIPModel, CLIPImageProcessor, AutoTokenizerimport numpy as np
1 prompt = [f"a photo of a {label} " for label in labels]
['a photo of a airplane',
 'a photo of a automobile',
 'a photo of a bird',
 'a photo of a cat',
 'a photo of a deer',
 'a photo of a dog',
 'a photo of a frog',
 'a photo of a horse',
 'a photo of a ship',
 'a photo of a truck']
1
2
3
model_path = "./clip-vit-base-patch32"
CLIPConfig {
  "_name_or_path": "./clip-vit-base-patch32",
  "architectures": [
    "CLIPModel"
  ],
  "initializer_factor": 1.0,
  "logit_scale_init_value": 2.6592,
  "model_type": "clip",
  "projection_dim": 512,
  "text_config": {
    "bos_token_id": 0,
    "dropout": 0.0,
    "eos_token_id": 2,
    "model_type": "clip_text_model"
  },
  "transformers_version": "4.36.2",
  "vision_config": {
    "dropout": 0.0,
    "model_type": "clip_vision_model"
  }
}
1
2
3
4
5
6
7
def get_image_predict_label (images ):"pt" , padding=True )1 )1 ).tolist()return [id_label_dict[label_id] for label_id in label_ids]
1
2
images = [_['img' ] for _ in cifar_10_test.select(range (5 ))]
['cat', 'ship', 'ship', 'airplane', 'frog']
1
2
3
4
5
6
7
8
9
10
11
12
13
14
15
16
17
18
19
20
from sklearn.metrics import classification_reportfrom tqdm import tqdmimport time32 0 while start < len (cifar_10_test):'img' ], sample['label' ]for label_id in label_id_list])print (start, end)print ('cost time: ' , time.time() - s_time)
cost time: 123.75668239593506
1 print (classification_report(y_true, y_pred, target_names=labels, digits=4 ))
              precision    recall  f1-score   support

    airplane     0.9504    0.9010    0.9251      1000
  automobile     0.8785    0.9760    0.9247      1000
        bird     0.8124    0.8880    0.8485      1000
         cat     0.8190    0.8600    0.8390      1000
        deer     0.9341    0.7650    0.8411      1000
         dog     0.8508    0.8840    0.8671      1000
        frog     0.9699    0.7740    0.8610      1000
       horse     0.8127    0.9760    0.8869      1000
        ship     0.9446    0.9550    0.9498      1000
       truck     0.9688    0.9010    0.9337      1000

    accuracy                         0.8880     10000
   macro avg     0.8941    0.8880    0.8877     10000
weighted avg     0.8941    0.8880    0.8877     10000
1
2
3
4
5
import matplotlib.pyplot as pltfrom sklearn.metrics import confusion_matrix, ConfusionMatrixDisplay"vertical" )
在clip-vit-base-patch32模型上的accuracy为0.8880,在clip-vit-large-patch14模型上的accuracy为0.9531.
Linear Probe Image Classification
linear probe指的是用训练好的模型先提取特征,然后用一个线性分类器来有监督训练。
以下是Linear Probe Image Classification的Python代码:
1
2
3
4
from datasets import load_dataset'cifar10' )'train' ].features['label' ].names
1
2
3
4
from PIL import Imageimport requestsfrom transformers import AutoProcessor, CLIPModelimport numpy as np
1
2
3
model_path = "./clip-vit-base-patch32"
1
2
3
4
5
6
7
8
9
10
11
12
13
14
15
from tqdm import trangedef get_sample (partition: str ):len (cifar_10[partition])20 512 ), dtype=np.float32), np.empty(shape=(num, 1 ), dtype=np.int8)for n in trange(0 , num, batch_size):'img' ], [[_] for _ in data[n:n+batch_size]['label' ]]"pt" )return images, label_ids.ravel()
1 train_images, train_labels = get_sample('train' )
100%|██████████| 2500/2500 [09:46<00:00, 4.26it/s]
1 test_images, test_labels = get_sample('test' )
100%|██████████| 500/500 [01:57<00:00, 4.26it/s]
1
2
3
4
from sklearn.linear_model import LogisticRegression1000 , random_state=0 , C=0.316 ).fit(train_images, train_labels)
1
2
3
from sklearn.metrics import classification_reportprint (classification_report(test_labels, pred_result, target_names=labels, digits=4 ))
              precision    recall  f1-score   support

    airplane     0.9631    0.9660    0.9646      1000
  automobile     0.9750    0.9760    0.9755      1000
        bird     0.9412    0.9280    0.9345      1000
         cat     0.8924    0.9040    0.8982      1000
        deer     0.9266    0.9340    0.9303      1000
         dog     0.9291    0.9170    0.9230      1000
        frog     0.9467    0.9600    0.9533      1000
       horse     0.9757    0.9630    0.9693      1000
        ship     0.9770    0.9780    0.9775      1000
       truck     0.9750    0.9750    0.9750      1000

    accuracy                         0.9501     10000
   macro avg     0.9502    0.9501    0.9501     10000
weighted avg     0.9502    0.9501    0.9501     10000
以clip-vit-base-patch32模型为基础,linear probe模型在CIFAR-10数据集上的accuracy为0.9501,比Zero Shot提升约6个百分点。
总结
本文主要介绍了OpenAI开源的CLIP模型,以及CLIP模型的简单使用,并且在CIFAR-10数据集上复现了Zero Shot以及Linear Probe的实验结果。https://github.com/percent4/clip_learning .
参考文献
CLIP:多模态领域革命者 CLIP in Hugging Face OpenAI Clip
欢迎关注我的公众号NLP奇幻之旅 ,原创技术文章第一时间推送。
欢迎关注我的知识星球“自然语言处理奇幻之旅 ”,笔者正在努力构建自己的技术社区。


